
diy robinson moth trap
DIY MV125 Robinson Moth Trap
I claim no credit whatsoever for the design of this particular trap. The information was obtained from Bird Forum and subsequent e-mails and telephone conversations with Pete Haynes who has been more than helpful in providing templates and advice. I understand the original design may have come from an Irish website - "Irish Moths"
The basis of this trap is a Garden Tidy Tub purchased from Wicks at a cost of £4.97. These may no longer be available but I'm sure similar tubs can be obtained from some of the other major DIY/Gardening outlets.
Parts Required
Part |
Supplier |
Cost |
| Garden Tidy Tub | Wicks - while stocks last. These are no longer available but you |
£12.08 |
| 1mm polycarbonate 2050 x 1250 sheet for cone and vanes | Purchased from Amari Plastics in Leeds but should be available at any local plastics supplier. Enough for approx 6 traps! | £25.84 |
| Funnel 12" | Mail order from http://www.brewuk.co.uk/funnel-12.html | £7.47 |
| Cover from 2 mtr length of 40mm electrical trunking | B&Q MK 40mm x 16mm x 3Mtr White Mini Trunking. Product Code 5017490586766 https://www.diy.com/departments/mk-40mm-x-16mm-x-3m-white-mini-trunking/823783_BQ.prd |
£6.00 |
| Stainless Steel Pan Head Screws and Nuts 24 M5 x 8 - 2 M4 x 12 | Purchased from Bolt & Nut Supplies in Pudsey but should be available from a local Bolt & Nut supplier | £2.50 approx |
| Bulb,bulb holder & waterproof electrical control | Paul Batty http://www.pwbelg.clara.net/mercury/sets/index.html If you are comfortable doing your own electrics this can be done for around £50 |
£89.95 + £7.95 postage |
| Paint - black suitable for plastic funnel | B&Q - | £7 Estimate |
| 3/4" x 0.032" Brass Strip for lamp holder | Any good model shop or http://www.hobbytools-direct.com/acatalog/Brass_Strip.html | £1.75 |
| 125W Mercury Vapour Lamp | Available from | £11.99 |
| Total Cost | Allowing for additional delivery charges | £180 approx |
Prices updated 11-08-2018
4

Photograph of my own DIY MV125 Robinson Trap
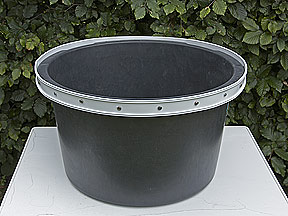
The first thing to do is attach the cover from the 40mm electrical trunking to the outer rim of the tub using the M5 x 8 Stainless Steel screws and nuts leaving enough above the rim to retain the cone. Twelve or so screws should be enough to secure it and keep it firmly in place.
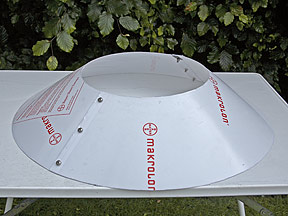
Secondly make a template from a piece of card (see template calculations) and trace out the two halves of the cone on the 1mm polycarbonate backing sheet. Cut out exactly to shape. I used Super Scissors (the type that "cut anything") and found it relatively easy to follow the contours of the template accurately. However, if a saw is used a very fine blade and slow speed are required to ensure the polycarbonate does not melt and jam the blade. An overlap of approximately 20mm is provided for securing the two halves together using three M5 x 8 screws and nuts for each joint.
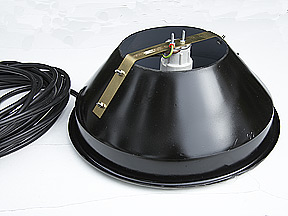

The next stage is to cut off the bottom section of the 12" Funnel. Then bend the 3/4" x 0.032" Brass Strip to fit the Funnel and secure the Ceramic Lamp Holder using 2 M4 x 12 screws and nuts. Depending on which screws you purchase it may be necessary to file down the head diameter to fit into the recesses in the lamp holder. The brass strip is then secured to the funnel using 4 M5 x 8 screws and nuts. Once the fixing position of the Lamp Holder and Brass support have been established, remove and paint the underside of the Funnel with a Black Paint suitable for adhering to plastic. Once completely dry the Funnel and Lamp Holder unit can then be wired and reassembled. To ensure that the wire is not pulled out of the connections I have attached a "P" clamp to one of the support fixing screws.
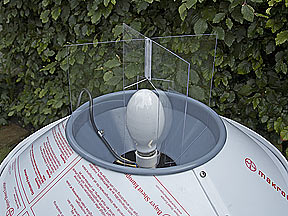
This virtually completes the trap apart from the vanes. The trap can be used with or without the vanes, however if desired these can be made from the 1mm polycarbonate sheet. Ensure that the angle at the bottom of the vanes exactly matches that of the funnel so that they will sit in position without the need for securing. Make sure there is at least a 6-7mm gap between the bulb and the vanes when fitted so as not to be affected by the high temperature generated by the bulb.
Finally remove the backing sheets from the polycarbonate cone, fill with egg boxes suitably arranged and you are ready to go.
I have not included a rain shield for my own trap as it is sited under cover and sheltered from the rain. If you intend to use the trap in the open and in all weathers, a suitable rain shield will be required and some form of drain fitted below the funnel in the base of the tub to ensure the moths are not endangered and the egg boxes remain dry! I may look at fitting a rain shield on future trap projects and will add the details to this page as and when completed.
To see photographs of some of the moths captured in this trap please visit Lepidoptera.
Note!
Always use an RCD unit to connect to the mains. If the electrical control unit is purchased from Paul Batty an RCD unit is usually included. If at all in doubt seek professional advice.
If I can be of any further assistance please do not hesitate to contact me via my contact page.